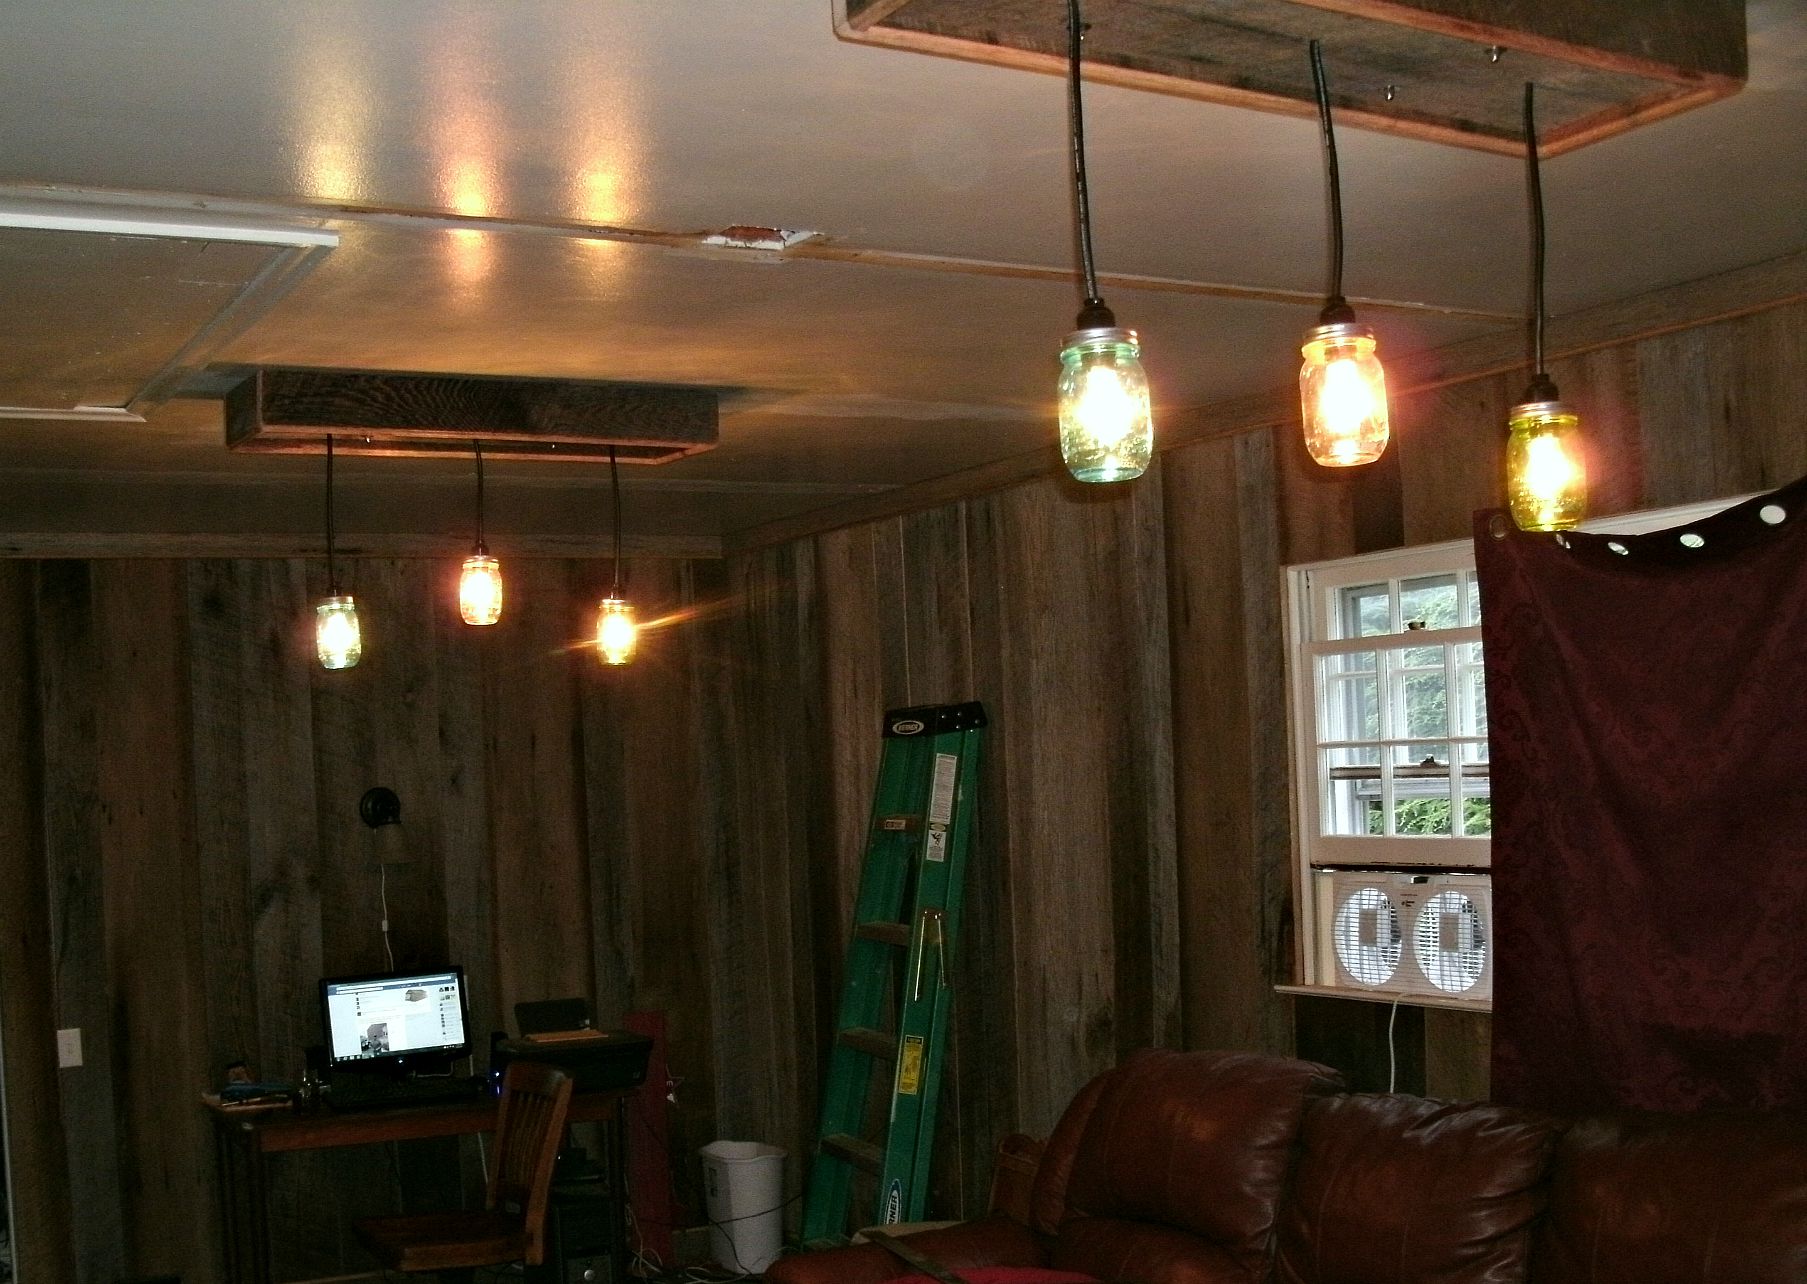
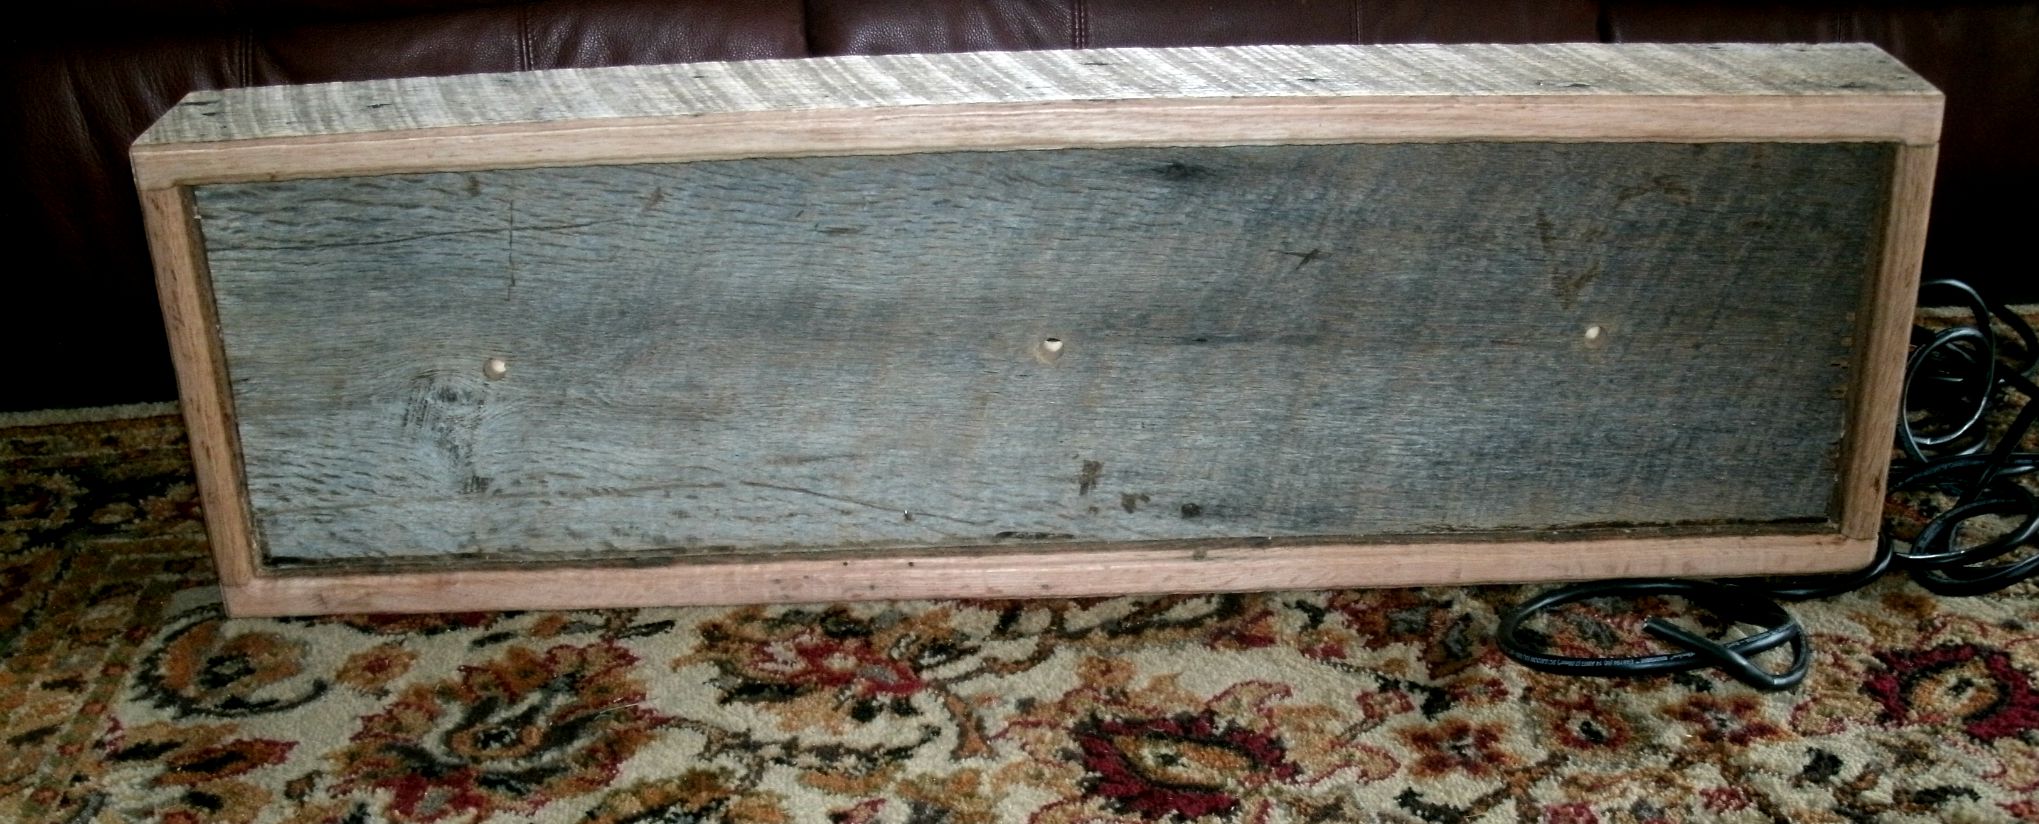
To add a real personal touch to the family room remodel Tom and I added two Mason Jar chandeliers. We removed an older ceiling fan/light fixture that did not properly light the large room and replaced them with 2 light boxes, with 6 bulbs of soft colored pendant lights. We got the idea from a looking at web pages that had barn wood and county rooms that had used Mason Jars as shades for light fixtures. Tom and I worked out what we wanted and the did some experimenting before settling on two lights instead of just one large one. This is what we ended up making out of the scrap wood left over from the walls. This is just one of the two light boxes we made.

Each box houses three lights (like the one above) and each light has a 40 watt clear appliance bulb inside a pint mason jar. Using the ring and seal as our bracket to support the jar. Each jar is removable can change in color or size, up to a quart jar with many decorative colors… This is my first combination Green, Clear and Blue. At some time in the future I will stain a few clear jars a warm yellow if Ball does not produce them soon!
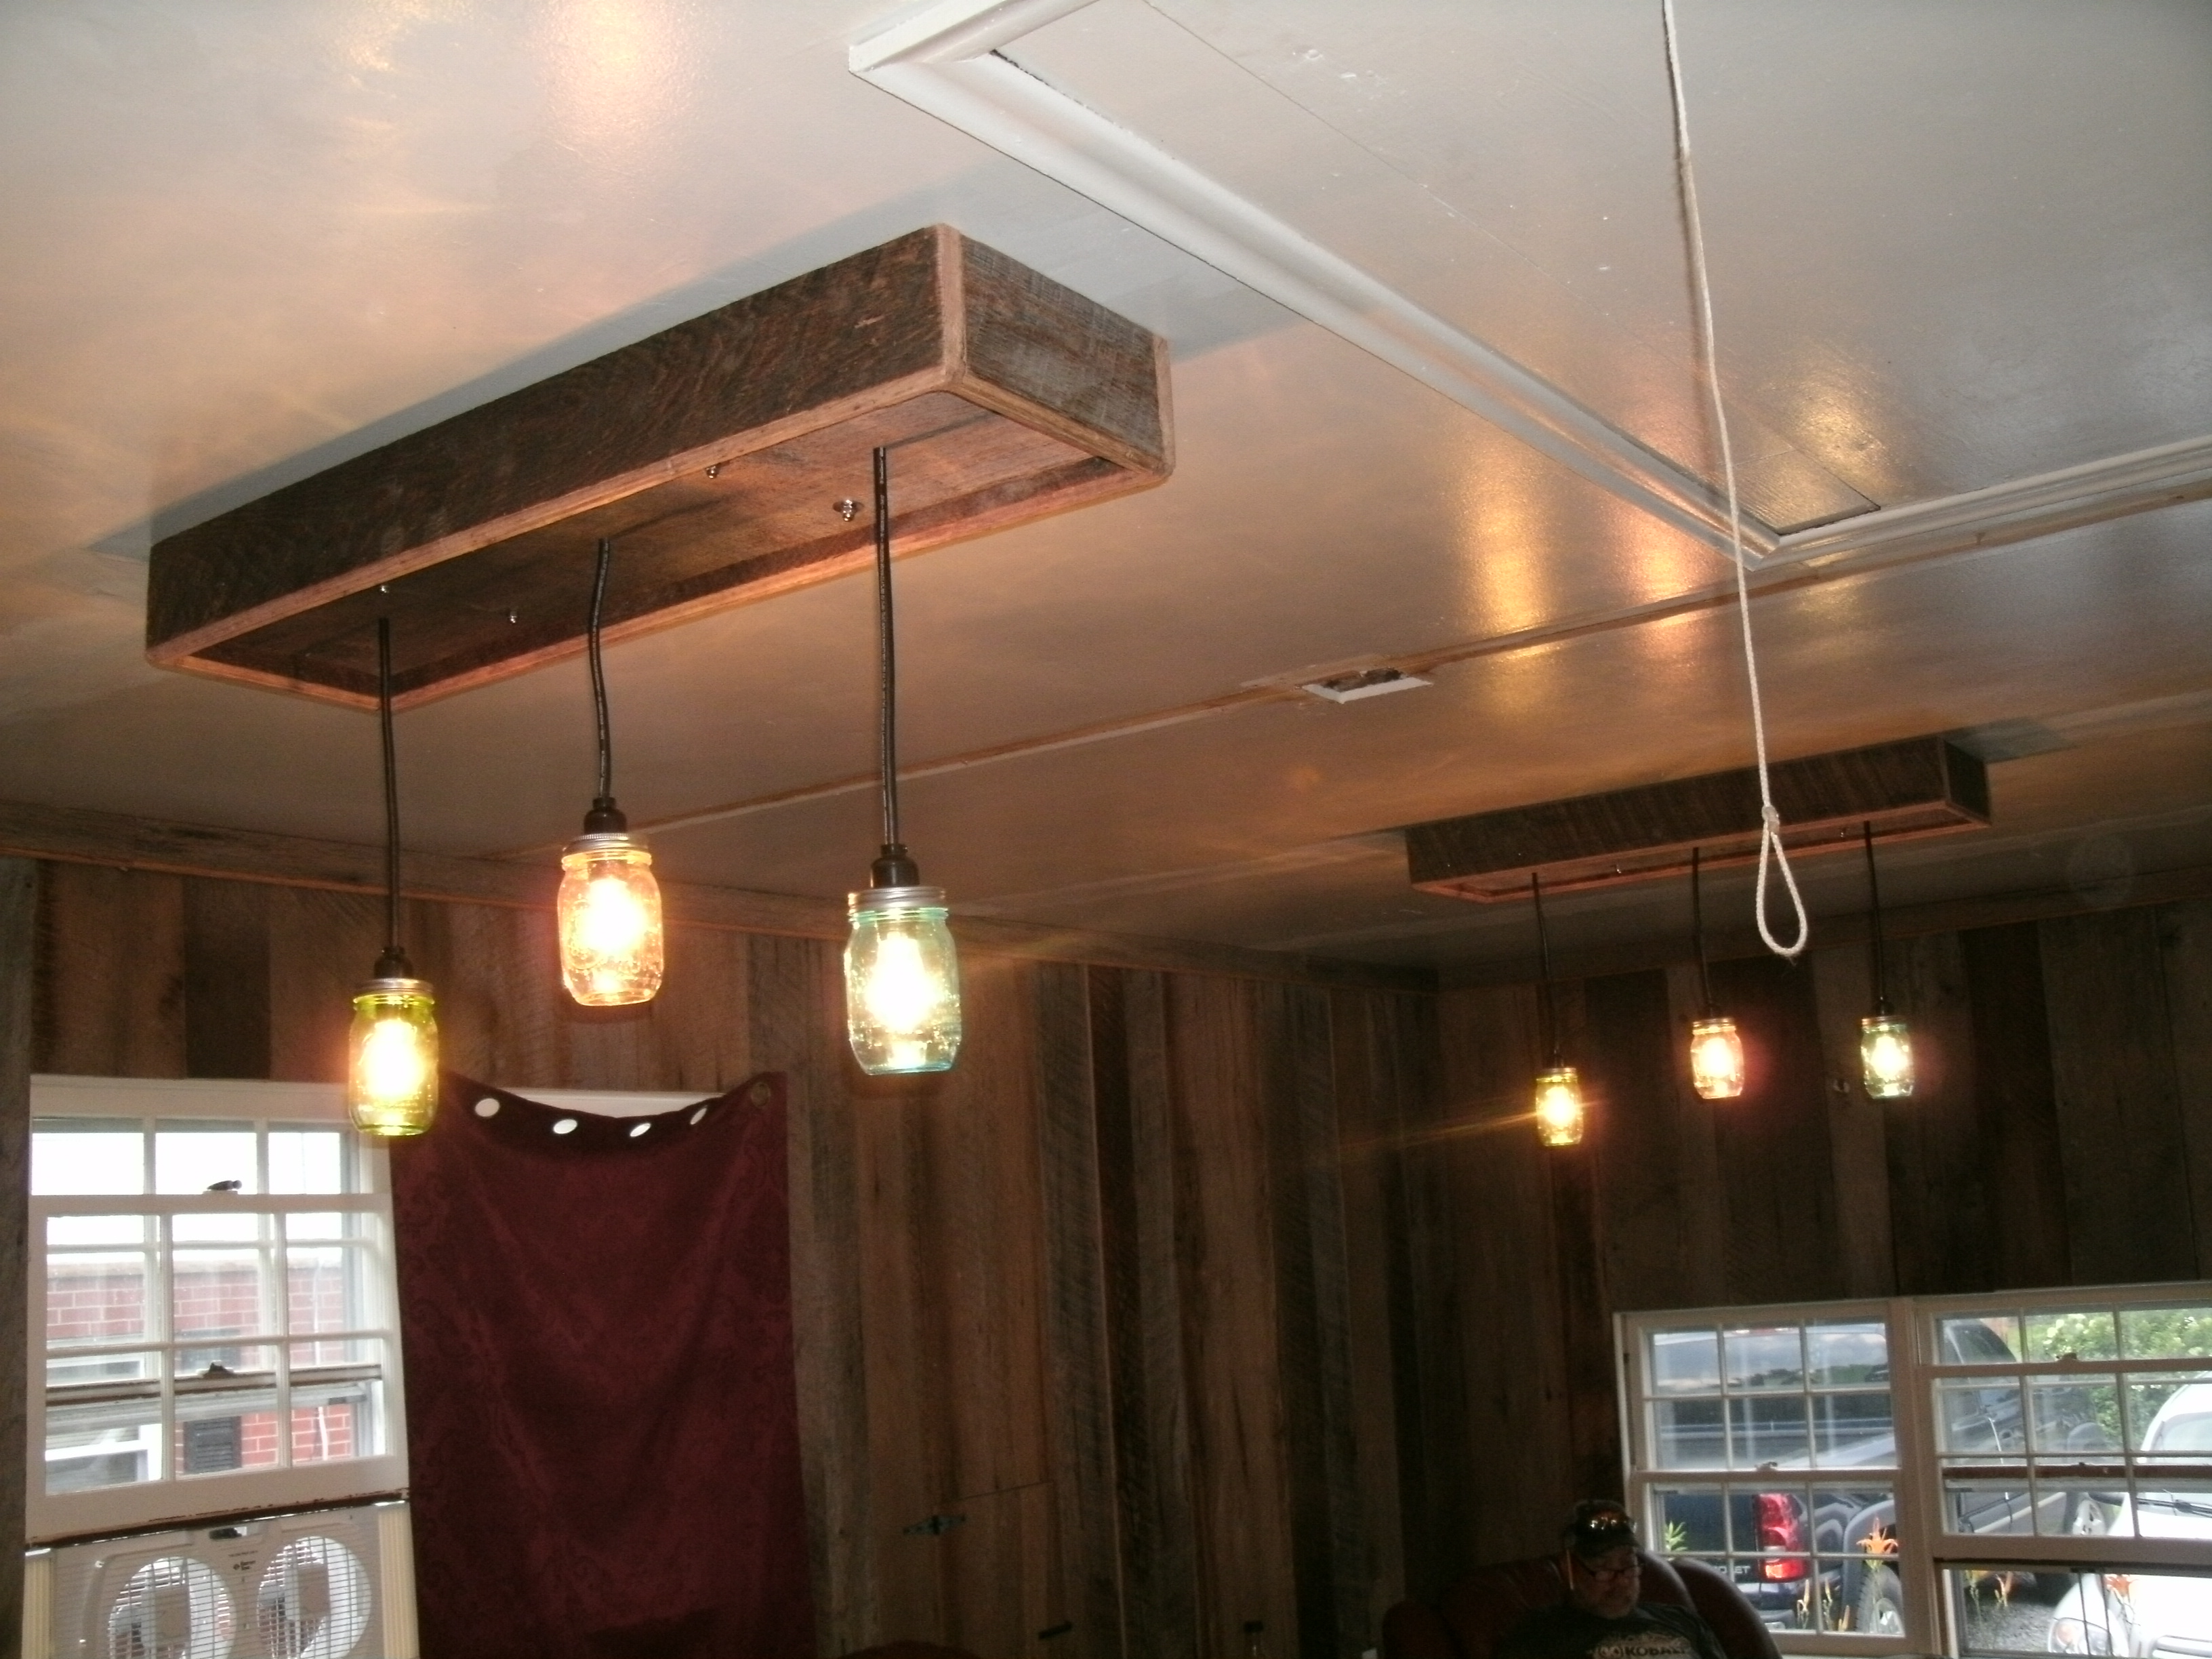
The room looks like this with both light fixtures, you can see in the photo where the ceiling fan/light used to mount. These lights are about 8 feet apart and mount to ceiling rafters with brackets in our attic. The brackets attached to wooden blocks on the drywall part of the ceiling that slide into the wood boxes and attach with double-sided blots that have wood screws on one side and machine screws on the other, topped with acorn nuts and washers.
The lights are pretty easy to make and there are a lot of ideas on the internet, some have “how to” videos and others are just photos. So to explain what we did here I have added some photos and descriptions that may help if you to make these yourself.
First, Tom and I had to decide three things, how much light we wanted, how many fixtures we wanted and finally how big should the shades be. So with a little test light that Tom wired up we started with clear quart jars and the idea of having 8 lights on one fixture using 90 watt clear bulbs. Wow that was just toooo bright.Unless we wanted to buy Edison light bulbs ( they appear sepia in color) at 9 dollars a bulb we had to come up with something less bright.
So we started to scale down what we wanted to make. The one big box idea changed to a two box light set up so that the light would fill the entire room and not blind people watching the T.V. Then we needed to rethink the amount of light we needed. I could have used the Edison bulbs at 60 watts they are still a less bright light than clear bulbs but the cost of the bulbs was just silly about ($100.00 ). The bulbs would cost more than the whole fixture.I still wanted clear bulbs so we went smaller and lower wattage. The standard 40 watt clear bulbs cost me 4 dollars for 4 bulbs, so the price was good and we could use a smaller shade and I had many jars to use.I have some clear jars and some colored already. I like the colored ones to use for drinking glasses,vases and candle holders. So I had no money in the colored pint jars and had lids and rings in my collection of canning supplies.
We then decided that 4 lights was really more than we needed wattage wise and the look of three pendants looks better than 4. So the two light boxes with three small jar covers with 40 watt bulbs became the plan. Tom made the boxes out of scrap wood we had left over from the Barnwood Builders remodel and drilled three holes for the light cord wiring. The wire was the most expensive portion of the fixture and we bought a 25 foot roll and had about 4 feet left over. Tom wanted the wire to match the socket and fill it completely so we kind over did what we needed to produce a 40 watt light but it looks great so the extra money was worth it in the long run.

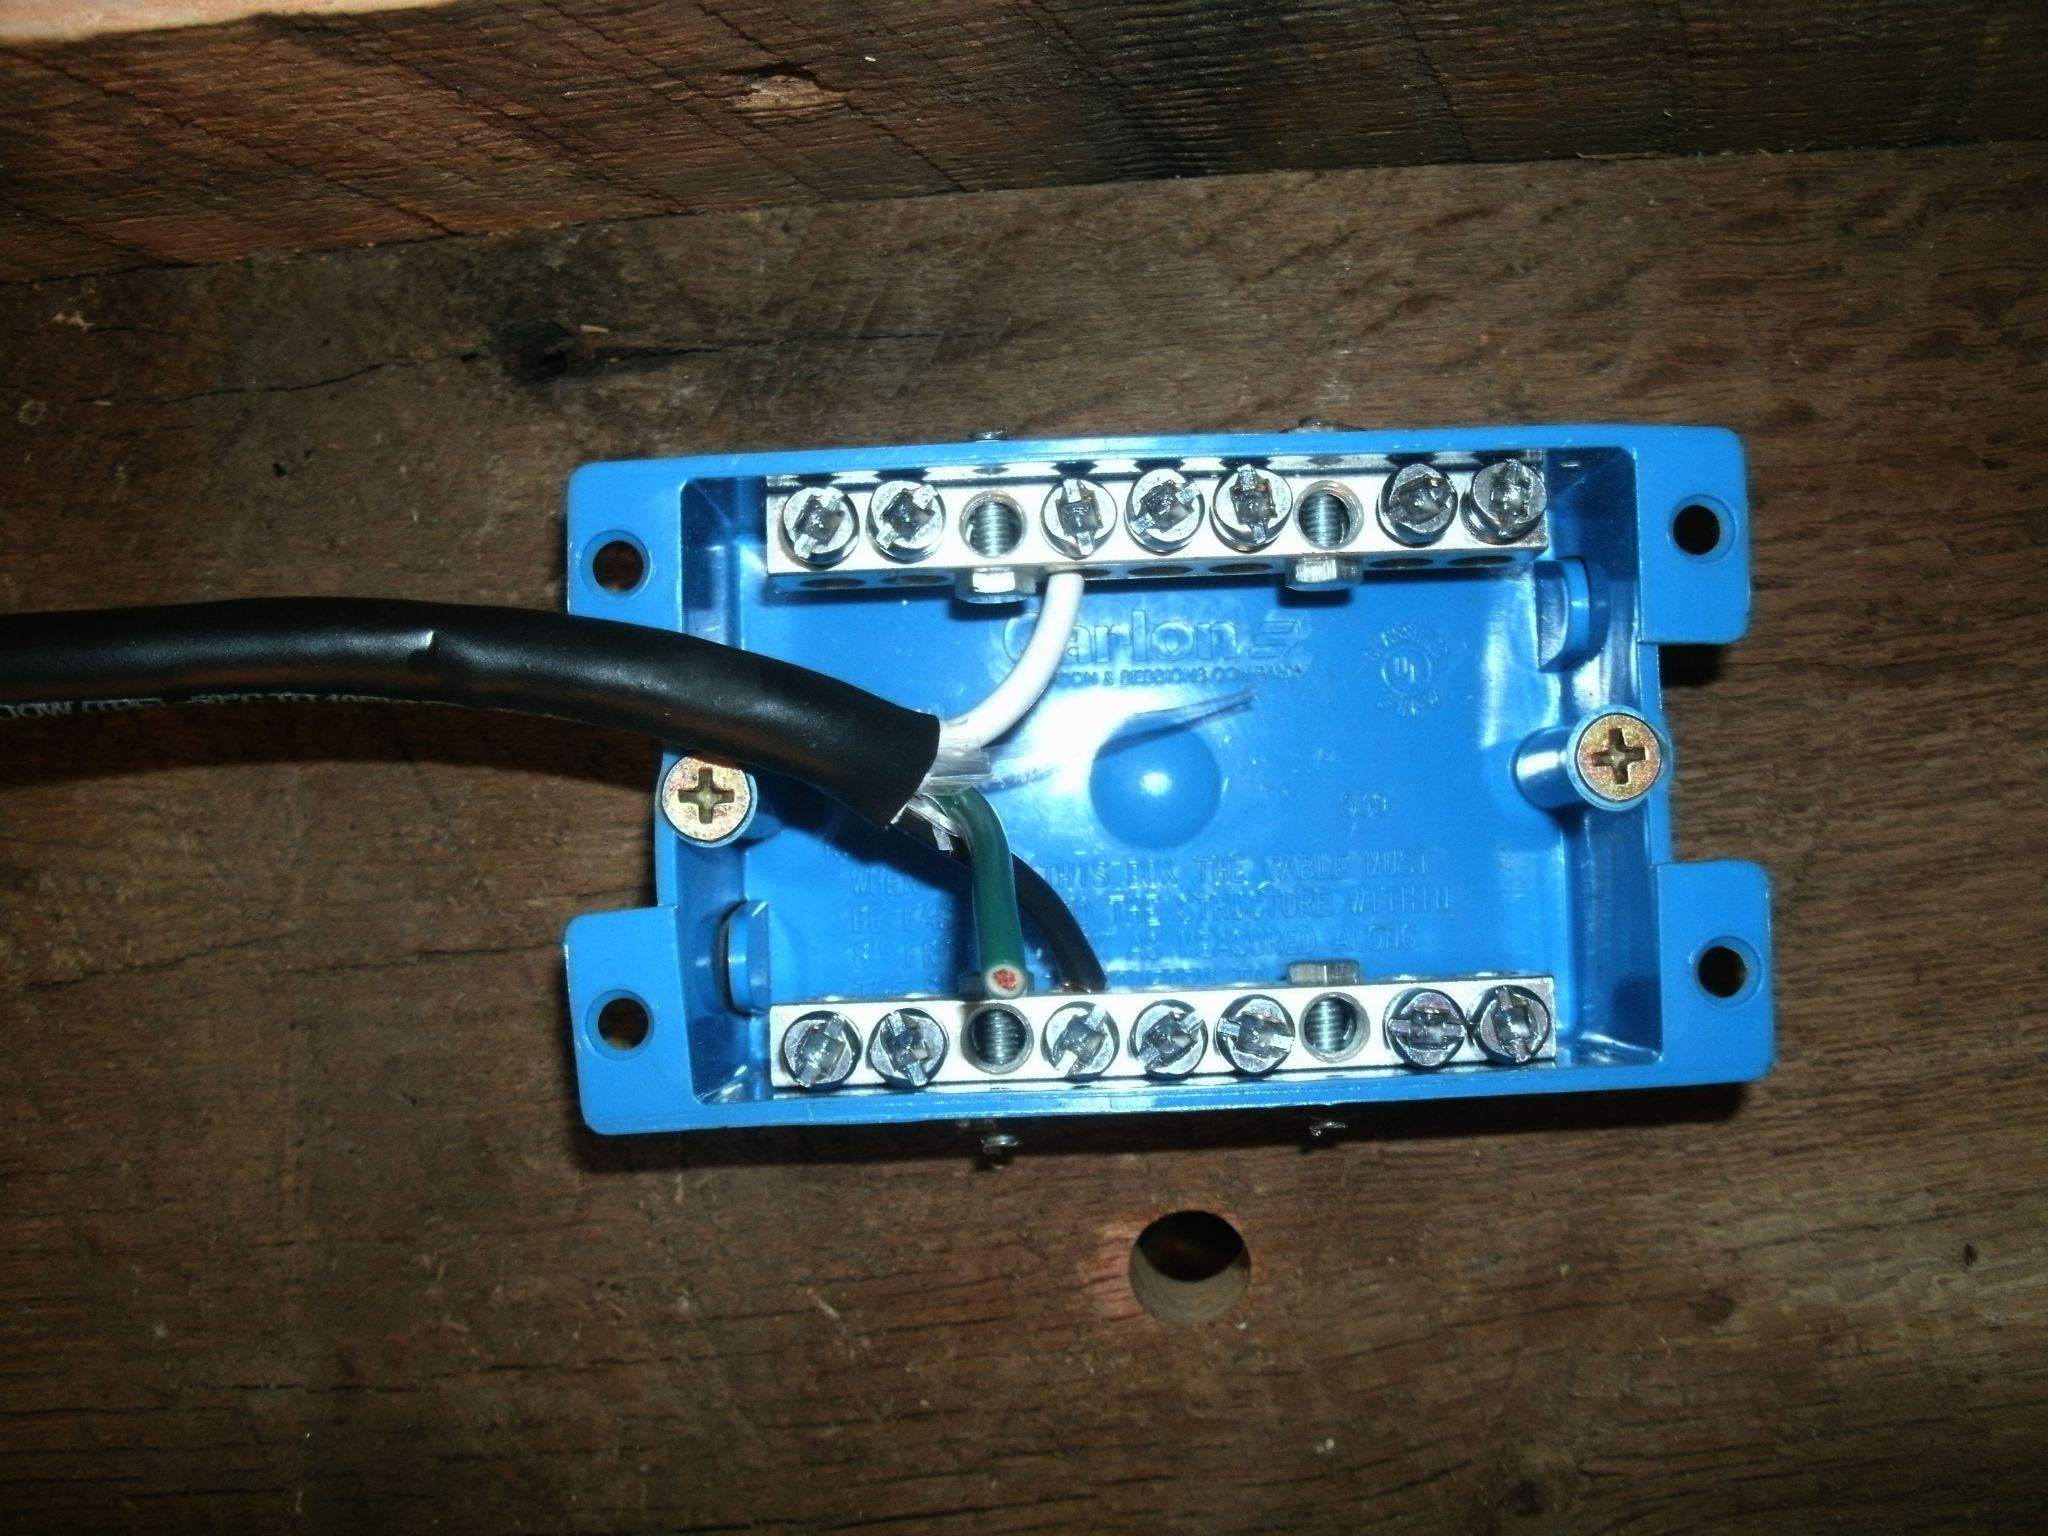
From here you can see how we could wire up more than one light to a single fixture. We mounted two Grounding Bars ( found in the fuse box section) to the side of a shallow blue wiring box. Each bar has room for several connections we would only use three on each bar. One bar is the ground and one bar is the hot,then the wiring box mounted to the center of the light box with wood screws. The cords were then cut to length on the other side and a zip ties applied to the cord so there was a stop on the cord. This prevents the weight of the shade and bulb from pulling on the cord and possibly pulling the cord out of the grounding bar. Then sockets attach to the cords. We used two-part sockets so that we could add the lid to the socket as the bracket to hold on the jar.


After adding the sockets to the cords it was time to make sure the wiring worked and add bulbs to see how bright the lights were. Tom just stripped an old extension cord down and wired it into the power bars on the inside of the box, plugged the other end into the wall outlet to see if what he had made worked properly; this is what I saw. Now we just needed to get the lids cut for the shades and add them to see if they were going to look good.
Cutting the lids was pretty easy if you leave the lids on the jars and tighten up the rings. Otherwise it is almost impossible to hold the lids in place with either your fingers or small clamps. Tom used a 32 mm hole cutter to cut the holes … the cutters hole is just shy of what we needed and the fit was rough from the cutter.


To make the edges smooth and increase the size of the hole Tom used a small grinding stone bit in his drill. He ground off the edge until the socket fit into each hole and the edges are not super sharp. Then he fits each socket into the lid and drills ventilation holes 4 each in the lid.


When complete the lids and rings were added to the sockets, then we screwed on the jars and tested again.


The installation was a two person job as the boxes are heavy. The barn wood box with wiring is held in place while the wires connect at the ceiling for a long time. I would suggest using two ladders it makes installation much easier. Be prepared to use a strong set of arms as you push the fixture on to the screws hanging down from the blocks attached to the ceiling. Once in place we were so excited to see that they both worked and the light filled the entire room instead of only in the middle that we just stopped working for a couple of days to enjoy what it looked like.
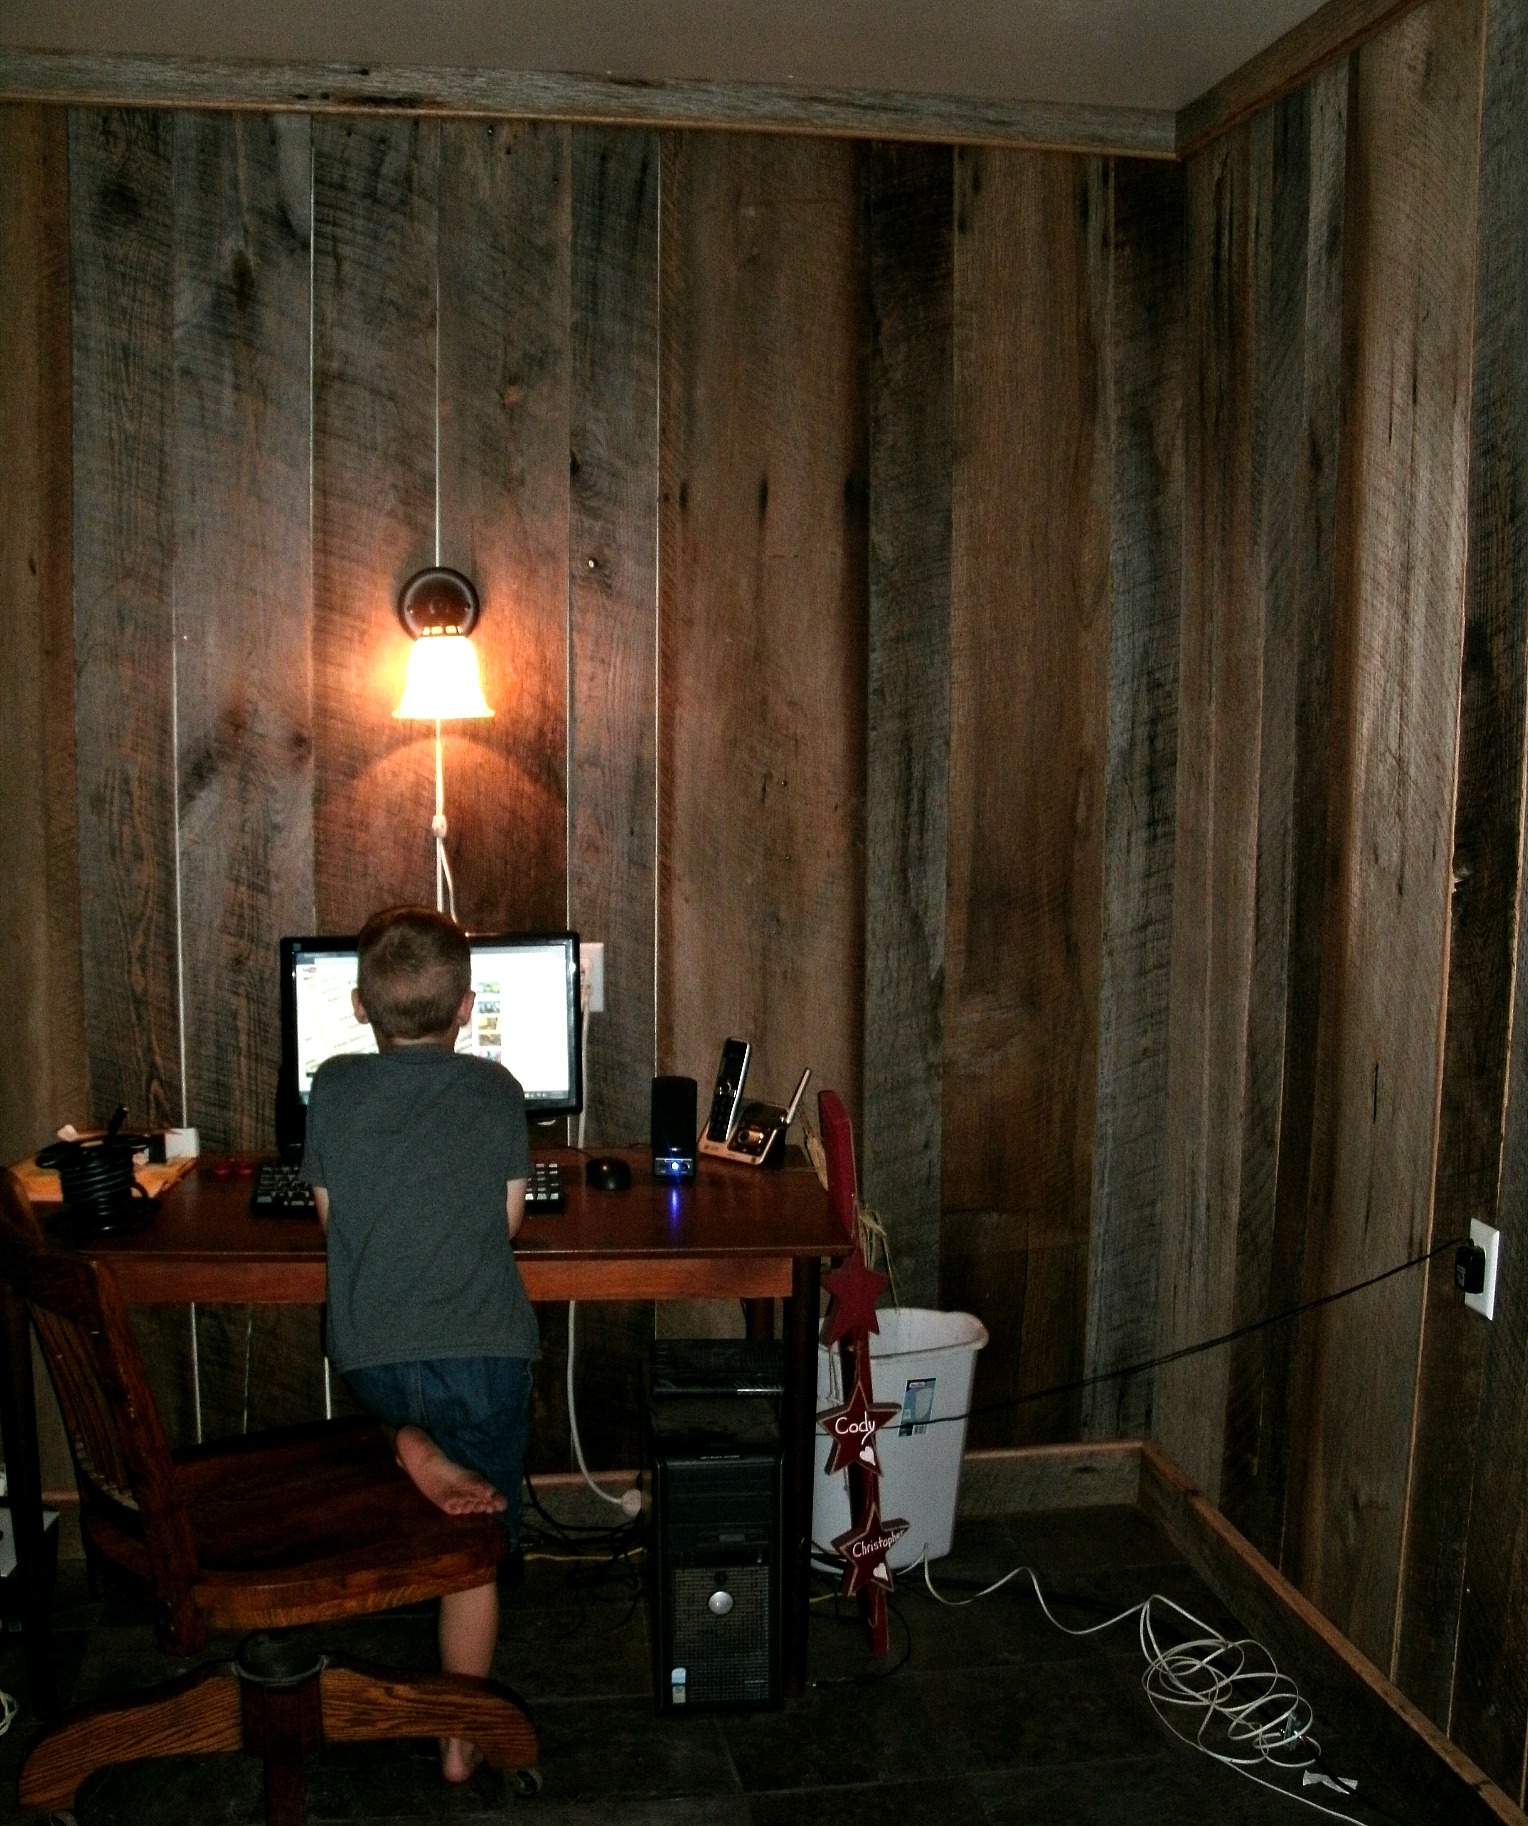
We have also added a small sconce light to the back wall over my computer desk so that we can see at the desk without turning on all the lights. Again it needed rewired because I did not want to open up the wall to install it. Tom added a switch cord and we stuffed the cord between the boars on the wall. It works great and in the future I will get a brown cord and tack the cord in place.
So I am slowly getting the furniture back in place, photos hung and rugs put down. It will be next week before we have every thing back in place and I can take after photos but this gives you an idea of how far we have come. It has been more work then I imagined and took about a month longer then I hoped. But we did this ourselves no contractor was really needed.We did call on lots of friends and family to help out over the last 4 months and it was all worth it in the end. Can’t wait to share the after photos.


Great project. I like it a lot. Gives me a lot of ideas on changing out a celing light that does not do it’s job as is.
Happy Gardening
LikeLike
Thanks for the garden wishes we need them here this year… and lots and lots of good idea is sooo true
LikeLike
These came out very nice. They work so well with the room and I like it when someone makes the perfect thing. Nice job describing the process. Thanks!
LikeLike
Looks great — would look great in my house. I’ll bet you can’t wait until you take a big breath and proclaim — we are done!!!!!
LikeLike
Yes Sandy next week I will finally get to enjoy the room and not work on it.
LikeLike
Just Amazing!
LikeLike
Nice job. I love DIY that are not fraught with disasters as many of mine are
LikeLike
OH MY!
LikeLike
It looks amazing, I love it!
LikeLike
sadly this is not made from a Pallet… but could be.. ours is old wood siding..
LikeLike
Have you considered submitting this piece to Backwoods Home Magazine? They publish how-to articles for self-sufficient living. I think this would be right up their alley, especially since you have photos and you were so thorough. It’s a cool project. Well done!
LikeLike
wow no monica I have not thought of sending my idea in.. .but now I will …. I personally have never read it and will have to look it up. Thank you for the idea and the support and liking the blog. I will be doing more in spring as we do some stone work in the house and replacing doors… but for the winter it is just trying to stay warm…. thanks again jolynn
LikeLiked by 1 person
Hi my name is Lesley brown and I am the great grand daughter of the original owners of the barn . I live in Baltimore Maryland . I was wondering if you guys have Any scrap lumbar left just for a keep sake . Or if you guys are selling the mason jar chandlers ? My uncle and my dad both live in Jane lew . My great grandmothers last name is Coffindafer . Thank you for sharing your story about the barn . My mom actually used to play in it as a kid . Every summer my uncle takes us back kincholoe to go to her house and the church that’s on the hill . A lot of my ansestors are buried on that hill . Thank you for doing all of this our family is pretty much spread out I couldn’t believe it was on TV.
LikeLike
Lesley I am so glad you took time to write to me about the barn. Some times the history of a place gets lost along the way and names are forgotten. As for the lumber,yes we have some the we did not use.. I will contact you at your email address attached to this note to work out some details on how to get some to you or the family members. I also would love to talk about the barn to with you in person if you ever have the time. I will be in touch.
LikeLike
Sounds great ! Thank you so much for responding .
Sent from my iPhone
>
LikeLike
Big fan of the show, the respect the men have for their findings and the old barns, and families who owned them originally. Wish I could travel to WV and see some of the area. Gotta love those “HillBillies” and Johnny Jett, his wealth of knowledge brings me joy!
LikeLike